Microsoft Excel Online Usage Scenarios
Reading Worksheets and Excel File Tables on OneDrive
After installing the Microsoft Excel Online connector, the OneDrive folder connected to the user's account will be scanned for Excel files, tables, worksheets, and tables will be added as views.
parseTablesOrWorksheets parameter of the modelProperties of the data source:- WORKSHEETS - to create views for each worksheet;
- TABLES - to create views for each table;
- ALL - to create views for all tables and worksheets;
- otherwise no worksheets or tables will be added as views
The worksheets or tables can be read as the connector's views. They are generated dynamically when the connector starts or using the Refresh metadata item in the context menu of the connector.
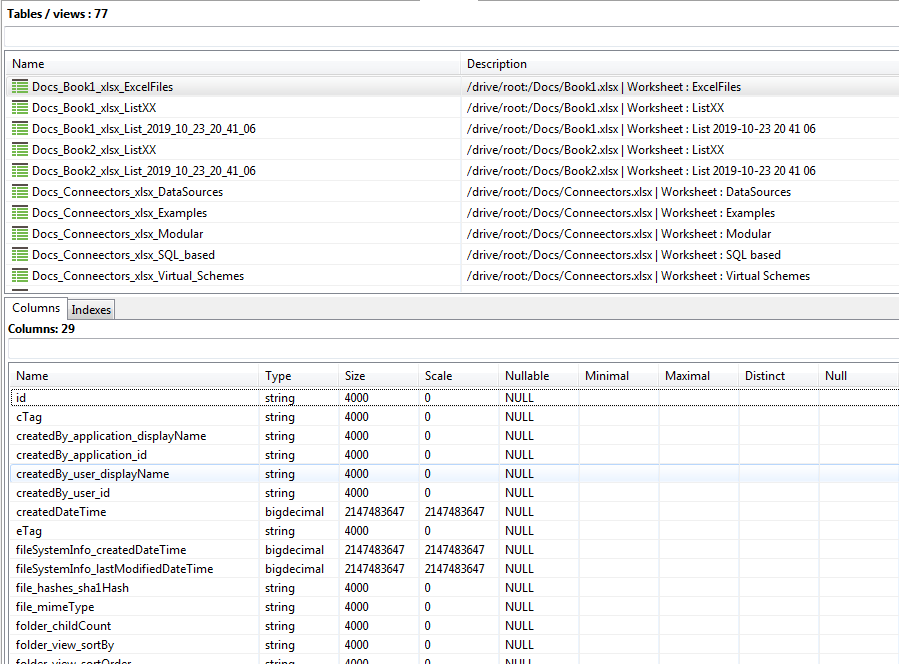
Below is an example of the views created for Excel files in OneDrive:
Uploading Data from a Procedure, Table, or View into an Excel Worksheet
Here are two examples of UploadToWorksheet usage to upload data to a worksheet:
/* Upload data from view into new or existing worksheet */
CALL excel_online_src.UploadToWorksheet (
    source_object => 'excel_online_examples.example_AllExcelFiles',
    drive_url => (CALL excel_online_src.url_Drive ()),
    file_path => 'Docs/Book1.xlsx',
    worksheet_name => 'ListXX',
    clean_worksheet => true
);;

/* Upload data from procedure with parameters into a worksheet */
CALL excel_online_src.UploadToWorksheet (
    source_object => 'excel_online_src.Files (drive_url => (CALL excel_online_src.url_Drive ()), files_url => (CALL excel_online_src.url_Files (path_relative_to_root => ''Docs'')))',
    drive_url => (CALL excel_online_src.url_Drive ()),
    file_path => 'Docs/Book1.xlsx',
    worksheet_name => 'Excel Files'
);;
The clean_worksheet parameter defines if all the data on the worksheet should be erased before uploading new data, otherwise the new data would be added below the existing. If the number of columns is the same as for old data, new data will be added below the old data without header with names of the columns, otherwise, the header will be added.
The UploadToWorksheet procedure can access a file and a worksheet by the parameters drive_url, file_id or file_path, worksheet_id or worksheet_name. If a worksheet specified by worksheet_name doesn't exist, it will be created. The clean_worksheet parameter determines whether all data on the worksheet should be deleted before uploading new data, otherwise the new data will be added below the existing. If the number of columns is the same as for the old data, new data will be added below the old data without a header with column names, otherwise the title will be added.
Please pay attention to the limitations of your OneDrive account plan, it may also include limits for the maximum size of an Excel file. When reaching the maximum size, the file stops working through the API until it is manually reduced in OneDrive.
Working with Excel Files Using the Microsoft Excel Online Connector API
The Microsoft Excel Online Connector API allows you to work with Excel files as procedures in the connector. They allow you to perform simple operations, such as getting information about worksheets, tables, charts, named elements, table columns, ranges, individual cells, etc., as well as operations that modify data in Excel files: insert new data, set data rows, delete, clear, create tables, worksheets, etc. There are also procedures connected with the basic OneDrive functions that allow create, read folders, and copy files etc. A complete list of API procedures is described at Public Microsoft Excel Online Connector API.
Writing Data to a Worksheet
A new workshed can be created via the command:
CALL excel_online.Worksheets_add (
    drive_url => (CALL excel_online.url_Drive ()),
    path_relative_to_root => 'Docs/Book1.xlsx',
    name => 'Solar System'
);;
You can upload data into a worksheet using the WorksheetRange_updateprocedure.
CALL excel_online.WorksheetRange_update (
    drive_url => (CALL excel_online.url_Drive ()),
    path_relative_to_root => 'Docs/Book1.xlsx',
    worksheet_id_or_name => 'Solar System',
    "address" => 'B5:E9',
    "values" => '[["Name", "Number", "AU", "km"],["Mercury", 1, 0.4, null],["Venus", 2, 0.7, null],["Earth", 3, 1, 149598000],["Mars", 4, 1.5, null]]',
    formulas => '[[null, null, null, null], [null, null, null, "=D6*E8"], [null, null, null, "=D7*E8"], [null, null, null, null], [null, null, null, "=D9*E8"]]'
);;
The file and worksheet should exist and can be identified by parameters drive_url, path_relative_to_root or worksheet_id_or_name. The address parameter is used to determine the range of cells for placing data. The range should be represented in A1 notation (not R1C1). The data for placement on the worksheet is presented in the form of a two-dimensional array in JSON format and is passed in the values parameter. The sizes of the range of cells and the array must match. An alternative filling for a range of cells are formulas, and they should be passed as parameters:
- formulas - for formulas that use A1 notation to address columns and use standard English Excel function names;
- formulasLocal - for formulas that use A1 notation to address columns and use localized Excel function names in user language;
- formulasR1C1 - for formulas that use R1C1 notation to address columns and use standard English Excel function names.
All the above formula parameters are also two-dimensional arrays in JSON format. The numberFormat parameter represents the number format of each cell, and is also a two-dimensional array in JSON format.
Writing data to a table
A table is an area on a worksheet that is defined as a table. It has a two-dimensional structure with named columns (and can show their names in the header) and rows. It flexibly changes its position and size on the worksheet while editing the parent worksheet or table. A table can be created using the following code:
CALL excel_online.Tables_add (
    drive_url => (CALL excel_online.url_Drive ()),
    path_relative_to_root => 'Docs/Book1.xlsx',
    worksheet_id_or_name => 'Solar System',
    address => 'B5:E9',
    hasHeaders => true
);;
After running the code above you will get id, name, and other information about the created table. Use id or name as the parameter table_id_or_name of the following example that adds data to the table.
CALL excel_online.TableRows_add (
    drive_url => (CALL excel_online.url_Drive ()),
    path_relative_to_root => 'Docs/Book1.xlsx',
    table_id_or_name => '{0BF66932-9B7F-441E-9379-80F090DC0A1C}',
    "values" = '[["Jupiter",5, 5.2, "=D10*E8"],["Saturn",6, 9.5, "=D11*E8"],["Uranus",7, 19.2, "=D12*E8"],["Neptune",8, 30.1, "=D13*E8"]]'
);;
Creating a Chart
You can create a chart using the Charts_add procedure. The sourceData parameter determines the range of data for plotting, and the seriesBy and type parameters determine how the chart will look like.
CALL excel_online.Charts_add (
    drive_url => (CALL excel_online.url_Drive ()),
    path_relative_to_root => 'Docs/Book1.xlsx',
    worksheet_id_or_name => 'Solar System',
    seriesBy => 'Auto',
    sourceData => 'B5:E13',
    type => 'ColumnStacked'
);;
The previous procedure will return the name and id of the chart. Then the chart can be correctly placed by the Chart_setPosition procedure, where it can be determined by the chart_name parameter with the position determined by the startCelland endCellparameters.
CALL excel_online.Chart_setPosition (
drive_url => (CALL excel_online.url_Drive ()),
path_relative_to_root => 'Docs/Book1.xlsx',
worksheet_id_or_name => 'Solar System',
chart_name => '{64064E49-3C8C-4DC3-87ED-4637BC359E48}',
startCell => 'G5',
endCell => 'P20'
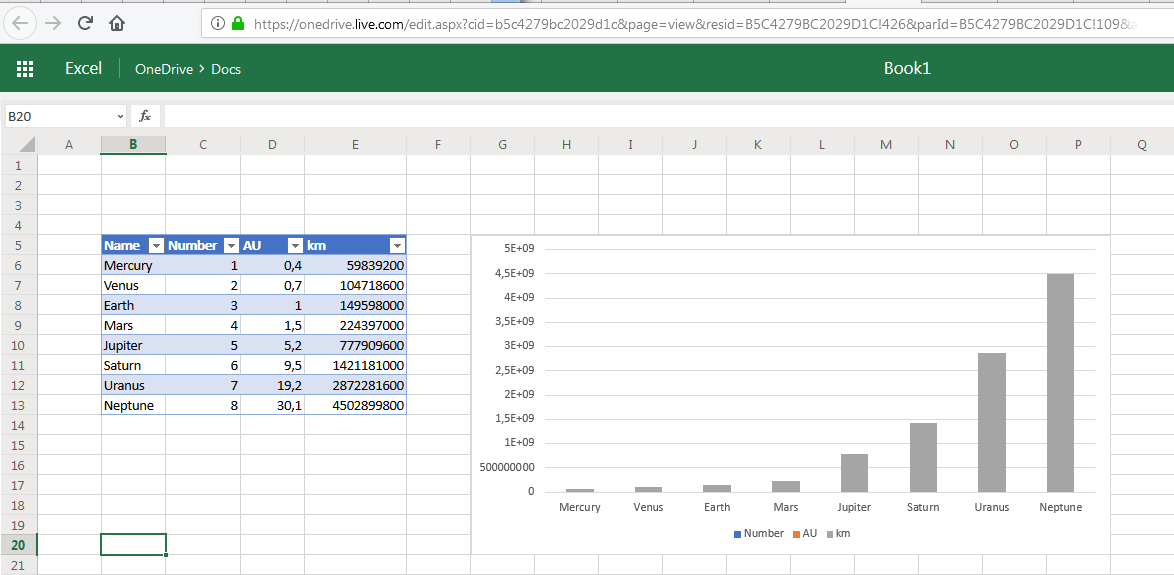
);;After completing all the above steps, you can see a picture similar to the screenshot: